Dice Boxes

There are some things that are a constant nemesis in my elementary classroom; the pencil sharpener . . . glue . . . dice . . . to name a few.  If you are a teacher, you know what I'm talking about - those things that the kids consistently abuse and misbehave with.  I have solved one of those problems!  One of my teaching neighbors recently had a baby.  She came back for a visit and brought with her lots and lots of small plastic boxes that once contained baby food.  I took some, not knowing what I would do with them.  But being a teacher, I knew they would come in handy at some point.  I now use them for dice!  And they are amazing!!

I use dice a lot!  They are great for practicing math facts, and since I teach first grade, we practice math facts every day.  The boxes solve the problem of dice flying around the room.  They solve the noise problem that all those dice hitting desks creates.  And they have turned math fact practice time into a much calmer activity than it was previously.
The boxes are from Gerber brand baby food.  You can buy a two-pack at War-Mart for $1.12.  I will occasionally buy the applesauce and eat it with my lunch (mmm . . . tasty?), but better yet, reach out to that person you know who recently had a baby and get them to save some for you.

They come in two sizes.  The taller ones are perfect, but the shorter ones work as well.  My foam dice work better in the taller boxes because they need more room to rotate within the box.  Hard plastic dice work well in the shorter ones.


They also hold up fairly well.  I have been using them for three years now, and have not had much breakage.  The lids are harder plastic and will sometimes crack.  The lower portion is softer and the corners of the boxes occasionally squish in if the kids bang them too hard on the table.


If you are also frustrated by misuse and abuse of dice, I would highly recommend this method of managing them.  It has cut-down on my dice-stress, and made my teaching life easier!


Amazing Discovery Today!

We had an intense thunder storm roll through this morning about a half-hour into the school day.  My second graders freaked out!!  Getting their attention back on Response to Literature was futile.
  

So, we stopped to talk about what was happening outside.  While the kids were talking in small groups about what they already knew about thunder and lightning, I quickly pulled up YouTube and searched for a kid-friendly video.  YouTube is a font of wonderful information if you can get through all the junk.  This morning, I found a 10 carat diamond!

I found an amazing video on thunder and lightning for kids, but more importantly I found an entire channel devoted to high-quality kid-friendly science videos on a plethora of topics!  The channel is called SciShowKids, and it is my newest favorite teaching tool.

The channel has over one hundred videos with titles like:
Meat-Eating Plants
All About Volcanos
How to Build a Sheet Fort
What are Boogers?
How to Feel Your Heart Beat
Why do Mosquito Bites Itch?
How do We Taste our Food?
Why do we Burp?
and
Sink or Float?
to name just a few!
Each video has an energetic narrator accompanied by a robotic mouse and explains each science concept in easy-to understand, kid-friendly language.  

My only wish is that they would speak a bit more slowly for my second language learners.  Other than that, these videos are awesome and well-worth checking out!!

Creating a QR Code Listening Center


I love technology, and I love incorporating it into my daily instruction, but when I first heard about QR codes I thought it was a bit much.  My first year teaching I had a chalkboard in my classroom after all, and now look how far we've come!!  Now that I've researched it a bit more, I can honestly say, working with QR codes is easy and fun.  So, I will walk you through it, and hopefully you will feel comfortable enough to try it out.

You will need to have three things:
access to YouTube (unfortunately, some districts block it)
a device that the kids can use - IPad, old IPhone, etc.
a QR reader app (they're free - search the app store for one)

The first thing you need to do is cruise YouTube for a good book; not all book videos are created equal!  The Storybook Factory, Storyline Online, and The Illustrated Book are a few of my favorite channels.  From this point, there are two ways to go.  I will cover both ways, and you can decide which you prefer.

#1: The Easy Way
Watch the video all the way through and make sure it will fit your needs.  If you like it, copy the URL at the top of the screen.


Go to safeshare.tv and paste the URL into the box.  Click the 'Generate Safe Link' button.


A new screen will open.  You now have the option to change the title and give the video a description.     I always check the two boxes below the description.  The first box makes your video private, and the second box removes the social media icons from the video.  Click submit.


The new safeshare version of the video will appear.  Copy the URL.  At this point, you will need to find a QR code generator.  My favorite is qrstuff.com.  Paste the URL into the box and a QR code will be generated to the right.  You can change the color if you want.  I keep them black and white since I don't have open access to a color printer.


Click 'download QR code' and it will be downloaded to your computer as a PNG file.  You can now manipulate, copy, and paste just like you would any other picture or piece of clipart.

The reason I don't prefer this method is that the safeshare video has options that the kids can select (and you know how kids like to push buttons!).  When the safeshare video comes up on your student device it looks like this:


There are three buttons at the top that can be selected: FAQ, Support, and API, as well as the language drop-down option.  They won't take the kids to anything they shouldn't see, but I prefer that they have no options outside of the 'play' button.  So, when I make my QR codes, I usually use the method outlined below.

#2: A Bit More Complicated (But Not Too Much)

Again, find a video and watch it all the way through.  If you like it, click on the share button beneath the video.


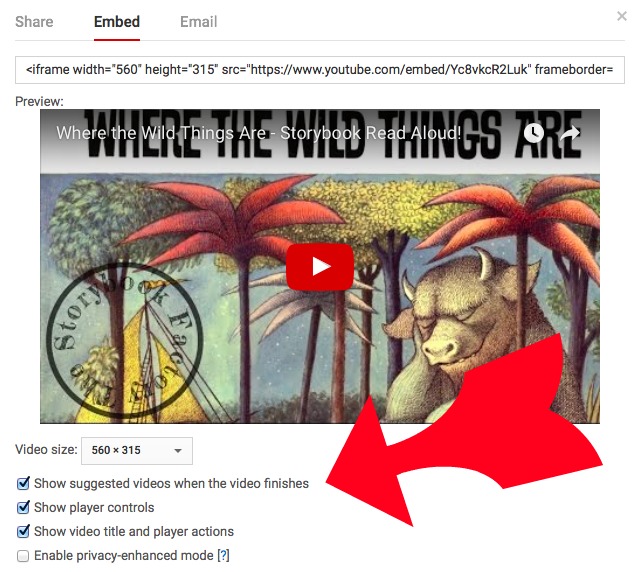
A bunch of icons will drop down, along with three selections: share, embed, and email.  Click on embed.  A long snippet of code will come up.  Click on 'show more' beneath the code.


Deselect any boxes that are checked, and copy the entire snippet of code.


I paste the code into a separate document to make it easier to manipulate.  It will look like this (without the highlighting):
Delete everything but the highlighted portion.  At the end, after the ampersand (&), add the following snippet of code:

autoplay=1

This will cause the video to open automatically, without all the extra videos that YouTube posts along the side of the screen.  The only thing the kids will see is the video and the red play arrow in the center of it (this is why I prefer this method).  There will also be no suggested videos at the end of the video.  It will simply stop playing.  The only option the kids will have is to exit out of it so they can scan another.

The final piece of code should look something like this:
https://www.youtube.com/embed/Yc8vkcR2Lukrel=0&autoplay=1

Go back to the QR code generator.


Copy your code and paste it in the box that says 'website URL.'


Select 'download QR code,' and it will be downloaded to your computer as a PNG file.  You can then copy, paste, and manipulate it just like you would any other picture or piece of clipart.  It will look like this:


I print them off, and tape them right on the front of the book.   Some teachers print them on cardstock, laminate them, and place them all on a ring. 


Good luck and happy listening!


GoNoodle!

A while back, I blogged about having class dance parties (you can see it here).  I have discovered something better!!  It is called GoNoodle, and it is awesome!  It is silly, energetic, fun, crazy, motivational, and best of all, FREE.
You sign up, log-in, and create your class (I set up a demo class first so that I could check out the content and make sure that it was kid-safe and appropriate before I showed it to my students).  You can set up more than one class at a time.  Give your class a name, enter how many students you have, and then select the grade level.  You will be prompted to choose an avatar (they call them Champs).  There are many to choose from (I let my students vote on the one they wanted):

Once an avatar is chosen, you will be taken to the student home screen.  It will look something like this (the avatar you choose will be in the middle):


Clicking on Dashboard will take you to the teacher home screen.  Our Champ will take you back to the student home screen if you're on one of the other screens.  Explore will take you to an introductory video for students if you are new to GoNoodle, and a selection of new videos if you have been using GoNoodle for awhile.  Channels will take you to the different channels that GoNoodle offers (more about this later).  Clicking Categories will display the different categories that the videos fall under so that you can choose the specific type of video you want to see.  There are two buttons at the bottom: Champs and Play.  Champs takes you to the avatar selection screen, and the Play button works just like the Explore button at the top.

I don't usually select Play with my students.  Instead, I will click on Channels and let them choose from there.  The Channels screen looks like this: 

Each button will take you to a variety of videos.  Most of the videos range from one to five minutes.
  • Don't know much about GoNoodle Plus.  It is a series of videos tied to core subjects that you need to pay for to see.  I live on a teacher's salary - enough said!
  • Awesome Sauce is a kid-favorite.  It contains 24 very silly videos that encourage dance and free movement.
  • Koo Koo Kanga Roo is another kid-favorite.  It has 32 songs featuring the two Koo Koo dudes during outrageous, crazy stuff.  This channel never fails to get my kids laughing, giggling, and moving.

  • Indoor Recess has 21 videos that are range from 7 to 18 minutes long.  They are great for indoor recesses (imagine that!).  They contain a mixture of movement and brain activities.
  • The Champ Harmonic are 5 videos featuring GoNoodle avatars moving to classical selections of music.
  • Zumba Kids has 18 activities that feature kids doing Zumba.  They are upbeat and energetic, and my kids love to follow along.
  • Flow contains 6 videos that encourage kids to slow down and be mindful.
  • MooseTube has 11 camp-style songs that will gets kids moving and singing along.
  • Fresh Start Fitness is 9 videos that are more like traditional work-out videos.  They feature people doing exercise moves to high-energy music.
  • Game On! contains 3 interactive games that will get kids moving.
  • Empower Tools contains 7 videos that teach kids some basic yoga moves.
  • Kidz Bop has 11 pop-song favorites featuring the Kidz Bop kids singing and dancing.
  • Brainercise with Mr. Catman is another kid-favorite.  These 11 activities feature a man in a cat mask (sounds silly, but the kids love it!) walking kids through moves that coordinate brain and body.

  • Maximo features an animated character guiding children through 21 different types of movements that are for calming, stretching, and relaxing.
  • Run With Us has 13 interactive track and field activities.
  • Think About It activities are designed to get students thinking and reflecting on positive aspects of life.
  • YouTube is a collection of brain break favorites (like Ants in Your Pants, Whip NaeNae, and Continental Drift) that have been found on YouTube.  You also have the option to add your own favorites from YouTube.
I would strongly encourage you check GoNoodle out.  It's great fun!!  If you like it, you can also invite parents and students to play at home.


Cute Student Valentines

I look forward to making Valentines for my students each year.  Beginning in December, I start searching for ideas.  I'm looking for something cute, but simple too.  Since I have to make Valentines for over 50 kids, they can't be too labor intensive or expensive to make.  This is what I decided on this year:

I found it here, and it inspired me to create my own using Powerpoint.  I was pleasantly surprised by how easy it was (there was a template on the website, but I needed it in Spanish, as well as English).  I made it so that there were four on one 8 1/2" - 11"  piece of cardstock.  I printed on my color printer, trimmed the white edges off, and cut them horizontally/vertically right down the middle - voila!

To finish them, I added a strip of hot glue - or I should say 'low-temp glue.'  Don't use "hot" glue or it will melt the Smartie wrapper.


Then stick on a pack of Smarties for your smarties!  


You can find my template here, minus my name, of course!  Since I teach a Spanish dual immersion class, the template has two pages: one Spanish, one English.


Tracking Accelerated Reader Points

My school started using Accelerated Reader this year, and I have been struggling with how to visually track my students' AR points.  So, I did a Google search (what did we do before Google?), and here is some of what I found: 
@Head over Heels for Teaching

@Step into 2nd Grade with Mrs. Lemon

@Teaching with Terhune


All very cute ideas!  They definitely got me thinking about what I could do in my room with the space I have available.  I wanted something that would give my students a visual reminder of the progress they were making towards their goal, and perhaps be a motivator for those students that continually lag behind.  Here is what I came up with:


 I teach the English-side of a dual immersion class.  That means that I have two groups of students that I teach everyday: the red class and the blue class.  It also means that I have to fit double the amount of students (all 51 of them!) into the space I have for the display.


I ended up using some blue and red Christmas paper that I had on hand to make strips for each student.


I printed off stickers (1"-2 5/8") with their names and their AR goals on them.  I used these stickers to anchor their strips to the cupboards along the back wall of my classroom.


Then I printed 1/2 a sheet of return address labels with points in .5 increments.  As students earn points, they add stickers to their strip to show their progress.


When they reach their goal, I add a large yellow star to the bottom of their strip.


I like that students can see where they are at, and where they are headed.  I like that I can reward students that reach their goal, and that it provides motivation for the other students to keep working towards their goals.  I like that it doesn't take up much room.  I'm not sure if I would do it this way again yet.