Showing posts with label Crafty Stuff. Show all posts

Holiday Fun Stuff & FREEBIE

We finished up two holiday crafts that we've been working on for a couple of days now.  They are adorable!  I have had so many teachers stop by my room and ask about them that I just had to share.  The first one is from Surfin' Through Second and is called Elf Yourself!  Head on over for a template.  Here is how my student elves turned out:


I have them put up outside my door and I can hear kids and teachers chuckling every time they walk past!

The other project we completed is to give to our parents for Christmas.  I got the idea from Classroom DIY, but I changed it a little bit.  If you click on the link you will find complete instructions.  Here's how ours came out:


Classroom DIY had her (?) students do a subway art style tile.  Since my students are 2nd graders, I had them create a drawing instead.  I made a tile-sized template for them to draw on.  They made their drawings in pencil, I outlined them in Sharpie, and then they colored them in with Sharpies.  I completed the rest of according to Classroom DIY's instructions.  My students will be taking them home on Friday to give to their parents for Christmas.  I'm very pleased with how they came out, and I think their parents will be tickled.

Thanks for the fantastic ideas Classroom DIY and Surfin' Through Second!

I also have a freebie for you: a Las Posadas mini-book.  I made this a couple of years ago to help my students understand the Mexican tradition of Las Posadas.  I hope you like it!  Click here to get it.


Photobucket

Snowman Ornaments

I make these ornaments with my students every year and they always turn out so cute!  The best part is that they are super easy to make.  You begin with salt dough:


  • 4 cups flour
  • 1 cup salt
  • 1 1/2 cups warm water
I also mix in white tempera paint to whiten the color up a bit. This recipe usually makes plenty for a class of 25.  If the dough is sticky, add more flour.  If it's too dry, add more water.  Here is the step-by-step:


1.  Give each student a rectangle of parchment paper, and have them write their name at the top.  I use parchment paper because it can be put in the oven without catching fire, and it allows me to keep track of whose snowman is whose while they are too soft to write on.

2.  Give each student a golf-ball sized chunk of white salt dough and have them separate it into three equal chunks.  They need to roll these chunks between their hands to make them into balls.  Caution them to do this quickly.  If the dough is handled too much it will get sticky!

3.  Have them place the largest ball at the bottom of their parchment paper.  Using the side of their hand, while it is curled into a fist, they will gently push down on the ball until it is about the size of a small cookie (not too thin!).

4.  Give each student a small amount of water (I usually put a margarine tub with water on each group's table).  They will dip their finger in the water and gently wet the very tiptop of the ball that they have flattened.  They will place a second ball on the wet part, so that they are overlapping slightly, and gently push down with the side of their fist until is is about the size of a small cookie.

5.  Repeat step #4 with the third ball of dough.

6.  Get a large handful of dough and mix in black tempera paint.  

7.  Give each student a marble sized chunk, and have them 
separate it into two balls.

8.  They will wet the tiptop of their snowman's head and place one black ball so that it is slightly overlapping the top of the head.  They will flatten it gently with the side of their fist.  This will become the snowman's hat.

9.  Taking the second ball of black, they will roll it between their palms to make it into a short, fat snake shape.

10.  Using their finger, they will wet where the black ball from step #7 overlaps the snowman's head.  They will lay the snake where the hat overlaps the head, and push it down gently with their finger to create the brim of the snowman's hat.


11.  Get a golf-ball sized chunk of dough and mix in orange tempera paint.  Give each student a small pinch and have them roll it between their palms to make a tiny snake.  They will dip it into the water and stick it in the middle of the snowman's face to create his carrot nose.

Collect all the snowmen and set them aside.  The student part is finished!

12.  You will need to bake the snowman in a 200 degree oven until they are dry (about 4-6 hours).

13.  Take them out and let them cool.  Peel the parchment paper off, and write the student's name on the back using a Sharpie.  On the front, using the Sharpie, add dots for eyes, a mouth, and buttons.

14.  Using a glue gun and paperclips, add a hanger to the back.

15.  Melt wax in a double boiler (you can buy wax in the canning section of your grocery store).  Dip the snowmen quickly into the wax to seal them.  I've never used shellac, but I don't see why you couldn't use it instead of wax.

16.  Add a ribbon around the snowman's neck for a scarf.


It seems like a lot now that I've written it all out, but it really is very easy to do.  And they always come out cute, especially when the kids make them a bit won-kitty!

Photobucket

Picture Rubric

I had an epiphany today; if I want my students to create better illustrations, I need to teach them what I expect!  (Hey, it's Friday of the first week of school, and I'm tired!).  I had an idea in the back of my mind of what I wanted, and I had seen it somewhere, but I couldn't remember where, so I created my own picture rubric:

 Sorry, this first one is a bit blurry, but there are clearer ones to come.  I just wanted you to see how I put the whole thing together.


Now, after my students have illustrated their writing, I ask, "What do you think of your illustration?  Is it a 1, 2, 3, or 4?"  And depending on their self-assessment, I can send them back to their seat to add more.  The quality of their illustrations has improved dramatically.  Sorry, but there is no template for this one;  If you want your students to see what you expect then you need to draw the pictures. but as you can tell, stick people work just fine!  It took me about 15 minutes to create, lamination and all.

Photobucket

Reading Phones


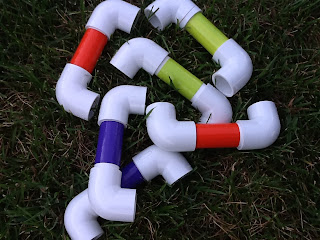
With the help of my ever-loyal assistant, Sam, I have checked another task off my summer to-do list!  I made 30 reading phones, and they were amazingly cheap, quick, and easy to make. 

 To make them, you will need 3/4" PVC pipe and 3/4" PVC elbows.  For each phone, you will need 3.5" of PVC pipe and two 3/4" PVC elbows.  Lowe's had the elbows in contractor packs of 10 for $3.06 (or you could buy them individually for 35 cents apiece).  The pipe was 10' in length, but it only cost $2.18.  At 3.5" each, the pipe makes 34 phone pieces. 

I also bought some colorful duct tape to decorate the phones.  This step totally up to you and your tastes.  I found the tape at Lowe's for $3.47 a roll, and it came in a variety of colors and patterns.  The darker colors are better at covering up the writing on the PVC pipe.  With the lighter colors, I found that if I wrapped it multiple times the writing would eventually not show through.

I began by marking the pipe into 3.5" lengths using a tape measure.  The pipe is easily cut with a hacksaw, but I used my table saw (don't be afraid of the power tools ladies!).  If you're not comfortable using the table saw, you can always ask the hubby to do it!  Make sure you wear eye protection because you will end up with a lot of staticy (sp?) PVC snow that flies everywhere!  It took me about five minutes to cut the pipe into 34 pieces.  

The next step is to put on the duct tape, if you are going to do that.  I tried a couple of different ways, and found that the easiest was to just cut a length of tape and roll it onto the tube leaving equal spaces on each side of the tape for the elbows (the elbows will not fit on over the tape).

Then, put one elbow on each end and push them towards the middle.  You can glue them if you want, but if you push them on tight enough your students won't be able to get them off (I had a hard time adjusting one when I got it on crooked!)

And here is the finished product.  I plan on putting them in a bucket, and letting my students use them as necessary.  I have also considered putting one in each student's book box, and then I won't have to worry as much about germs.  I'm finding that the longer I teach, the more OCD I get about germs!

Since I chose to put the tape on, it took me about an hour to make them.  Without the tape, you could easily have them done in 15 minutes.

Plastic Crate Student Seats

Yeah!  I can finally check-off one of my summer to-do's.  Over the past year I have seen several blogs and posts on Pinterest that outlined how to make student seating out of plastic crates and was inspired to try and create them myself.  They were surprisingly easy to make (and I'm not very crafty!), and they were not too expensive either.  I bought the crates at Wal-Mart for $26.97 for a set of six (I actually made 8, but that's neither here nor there).  They had several nice colors to choose from.


They also had some great heavy-duty fabric available for $6.97 a yard.  I bought three yards, but I could have easily gotten away with two.  I had previously priced foam padding at my local fabric store and it was way out of my budget.  One of the blogs I found had used a foam mattress topper for the seat padding, and I went that route instead.  Wal-Mart carries them for $11.97.  I bought a full-size topper, and I put double padding on each seat.  It worked out perfectly with a little bit to spare (remember, I made eight seats.  If you are only making six, you might be able to get away with a twin if you only put one layer of padding).


Crossed the street to Lowe's to find the wood.  I bought one sheet of 1/2" plywood for $18.47, and a very helpful (and handsome!) young man cut if for me right there in the store.  Lowe's will make three cuts for free, but when I mentioned that I was making them for my classroom, he cut them all for free.  Unfortunately, I mis-measured (duh!) and had to trim them when I got home.  The perfect size to fit on the lip inside the crate ended up being 12.75" by 15.5".


Okay, now everything was ready to put together.  I cut the fabric and the foam.  Make sure the foam is the same size as the board, you don't want any overlap as it will keep the board from fitting snuggly inside the crate.  When you cut the fabric, make sure to cut it 2-3" larger than the board all the way around.  Save yourself some time, and cut through several layers at one time.


Lay the fabric face down.  Put the padding in the center of the fabric and lay the board on top.  Using a staple gun, staple the fabric along one side (do not pull).  On the opposite side, pull the fabric tight by leaning down on the board, and staple in place starting with the staple in the middle and working your way towards the corners.  On the other two sides, you need to worry about the corners.  I started by putting one staple in the center and then moving to the corner.  I tucked the fabric, making a hospital corner (kind of like how you would wrap a package), and then pulling tight and stapling in place.


The last step is to add a loop.  Since these seats have a dual function (student seating and storage), you want to be able to easily access the storage portion of the seat.  So, I added a loop of grosgrain ribbon (just look at those beautiful bent staples!).


Voila!  The finished product: