Showing posts with label teacher stuff. Show all posts

Dice Boxes

There are some things that are a constant nemesis in my elementary classroom; the pencil sharpener . . . glue . . . dice . . . to name a few.  If you are a teacher, you know what I'm talking about - those things that the kids consistently abuse and misbehave with.  I have solved one of those problems!  One of my teaching neighbors recently had a baby.  She came back for a visit and brought with her lots and lots of small plastic boxes that once contained baby food.  I took some, not knowing what I would do with them.  But being a teacher, I knew they would come in handy at some point.  I now use them for dice!  And they are amazing!!

I use dice a lot!  They are great for practicing math facts, and since I teach first grade, we practice math facts every day.  The boxes solve the problem of dice flying around the room.  They solve the noise problem that all those dice hitting desks creates.  And they have turned math fact practice time into a much calmer activity than it was previously.
The boxes are from Gerber brand baby food.  You can buy a two-pack at War-Mart for $1.12.  I will occasionally buy the applesauce and eat it with my lunch (mmm . . . tasty?), but better yet, reach out to that person you know who recently had a baby and get them to save some for you.

They come in two sizes.  The taller ones are perfect, but the shorter ones work as well.  My foam dice work better in the taller boxes because they need more room to rotate within the box.  Hard plastic dice work well in the shorter ones.


They also hold up fairly well.  I have been using them for three years now, and have not had much breakage.  The lids are harder plastic and will sometimes crack.  The lower portion is softer and the corners of the boxes occasionally squish in if the kids bang them too hard on the table.


If you are also frustrated by misuse and abuse of dice, I would highly recommend this method of managing them.  It has cut-down on my dice-stress, and made my teaching life easier!


Creating a QR Code Listening Center


I love technology, and I love incorporating it into my daily instruction, but when I first heard about QR codes I thought it was a bit much.  My first year teaching I had a chalkboard in my classroom after all, and now look how far we've come!!  Now that I've researched it a bit more, I can honestly say, working with QR codes is easy and fun.  So, I will walk you through it, and hopefully you will feel comfortable enough to try it out.

You will need to have three things:
access to YouTube (unfortunately, some districts block it)
a device that the kids can use - IPad, old IPhone, etc.
a QR reader app (they're free - search the app store for one)

The first thing you need to do is cruise YouTube for a good book; not all book videos are created equal!  The Storybook Factory, Storyline Online, and The Illustrated Book are a few of my favorite channels.  From this point, there are two ways to go.  I will cover both ways, and you can decide which you prefer.

#1: The Easy Way
Watch the video all the way through and make sure it will fit your needs.  If you like it, copy the URL at the top of the screen.


Go to safeshare.tv and paste the URL into the box.  Click the 'Generate Safe Link' button.


A new screen will open.  You now have the option to change the title and give the video a description.     I always check the two boxes below the description.  The first box makes your video private, and the second box removes the social media icons from the video.  Click submit.


The new safeshare version of the video will appear.  Copy the URL.  At this point, you will need to find a QR code generator.  My favorite is qrstuff.com.  Paste the URL into the box and a QR code will be generated to the right.  You can change the color if you want.  I keep them black and white since I don't have open access to a color printer.


Click 'download QR code' and it will be downloaded to your computer as a PNG file.  You can now manipulate, copy, and paste just like you would any other picture or piece of clipart.

The reason I don't prefer this method is that the safeshare video has options that the kids can select (and you know how kids like to push buttons!).  When the safeshare video comes up on your student device it looks like this:


There are three buttons at the top that can be selected: FAQ, Support, and API, as well as the language drop-down option.  They won't take the kids to anything they shouldn't see, but I prefer that they have no options outside of the 'play' button.  So, when I make my QR codes, I usually use the method outlined below.

#2: A Bit More Complicated (But Not Too Much)

Again, find a video and watch it all the way through.  If you like it, click on the share button beneath the video.


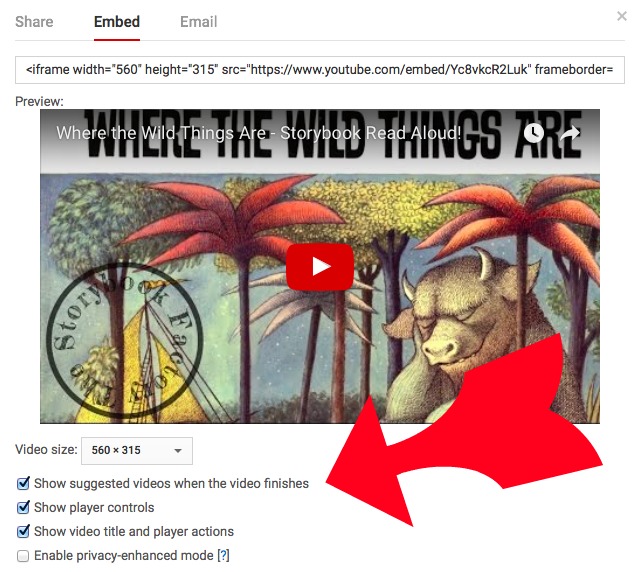
A bunch of icons will drop down, along with three selections: share, embed, and email.  Click on embed.  A long snippet of code will come up.  Click on 'show more' beneath the code.


Deselect any boxes that are checked, and copy the entire snippet of code.


I paste the code into a separate document to make it easier to manipulate.  It will look like this (without the highlighting):
Delete everything but the highlighted portion.  At the end, after the ampersand (&), add the following snippet of code:

autoplay=1

This will cause the video to open automatically, without all the extra videos that YouTube posts along the side of the screen.  The only thing the kids will see is the video and the red play arrow in the center of it (this is why I prefer this method).  There will also be no suggested videos at the end of the video.  It will simply stop playing.  The only option the kids will have is to exit out of it so they can scan another.

The final piece of code should look something like this:
https://www.youtube.com/embed/Yc8vkcR2Lukrel=0&autoplay=1

Go back to the QR code generator.


Copy your code and paste it in the box that says 'website URL.'


Select 'download QR code,' and it will be downloaded to your computer as a PNG file.  You can then copy, paste, and manipulate it just like you would any other picture or piece of clipart.  It will look like this:


I print them off, and tape them right on the front of the book.   Some teachers print them on cardstock, laminate them, and place them all on a ring. 


Good luck and happy listening!


Cute Student Valentines

I look forward to making Valentines for my students each year.  Beginning in December, I start searching for ideas.  I'm looking for something cute, but simple too.  Since I have to make Valentines for over 50 kids, they can't be too labor intensive or expensive to make.  This is what I decided on this year:

I found it here, and it inspired me to create my own using Powerpoint.  I was pleasantly surprised by how easy it was (there was a template on the website, but I needed it in Spanish, as well as English).  I made it so that there were four on one 8 1/2" - 11"  piece of cardstock.  I printed on my color printer, trimmed the white edges off, and cut them horizontally/vertically right down the middle - voila!

To finish them, I added a strip of hot glue - or I should say 'low-temp glue.'  Don't use "hot" glue or it will melt the Smartie wrapper.


Then stick on a pack of Smarties for your smarties!  


You can find my template here, minus my name, of course!  Since I teach a Spanish dual immersion class, the template has two pages: one Spanish, one English.


Tracking Accelerated Reader Points

My school started using Accelerated Reader this year, and I have been struggling with how to visually track my students' AR points.  So, I did a Google search (what did we do before Google?), and here is some of what I found: 
@Head over Heels for Teaching

@Step into 2nd Grade with Mrs. Lemon

@Teaching with Terhune


All very cute ideas!  They definitely got me thinking about what I could do in my room with the space I have available.  I wanted something that would give my students a visual reminder of the progress they were making towards their goal, and perhaps be a motivator for those students that continually lag behind.  Here is what I came up with:


 I teach the English-side of a dual immersion class.  That means that I have two groups of students that I teach everyday: the red class and the blue class.  It also means that I have to fit double the amount of students (all 51 of them!) into the space I have for the display.


I ended up using some blue and red Christmas paper that I had on hand to make strips for each student.


I printed off stickers (1"-2 5/8") with their names and their AR goals on them.  I used these stickers to anchor their strips to the cupboards along the back wall of my classroom.


Then I printed 1/2 a sheet of return address labels with points in .5 increments.  As students earn points, they add stickers to their strip to show their progress.


When they reach their goal, I add a large yellow star to the bottom of their strip.


I like that students can see where they are at, and where they are headed.  I like that I can reward students that reach their goal, and that it provides motivation for the other students to keep working towards their goals.  I like that it doesn't take up much room.  I'm not sure if I would do it this way again yet.


Class Dance Party!

I have always given my kids brain breaks throughout the day, but this year I have tried something different.  My kids begged my to play a YouTube dance song one day, and it has changed our whole brain break routine.  We now have Dance Parties! instead of brain breaks.  The kids love it, and they only take 3-4 minutes.  When I first looked at them, I thought my students were crazy, but now I get it.  They are fun!

There are videos on YouTube that are basically video game rips.  They show players dancing to songs via their video games.  My students love to follow along and imitate the dance moves.  They are up and engaged, getting the wiggles out, and getting a quick break to recharge their batteries.
Here are a few of their favorites (click on the picture to go to the video):
Gummy Bear

Calling All the Monsters

Ghostbusters

Happy

What does the Fox Say?

Who doesn't love YMCA?

These are just a sampling of what is out there.  On YouTube, search for "kids dance party" or "just dance videos" and you will find hundreds.  Just make sure to watch it before you show it!!  The best part is that each video averages 3-4 minutes.  They make a great, quick break.  And I will often use them as bribes - for example, "If we can get through the next five minutes without anyone interrupting, we can have a quick dance party!"  Have fun!


Whiteboard Marker Mayhem!

Ever have trouble with whiteboard markers?  Who hasn't!!!!  I have figured out a couple of tricks over the years that have made my whiteboard marker nightmares disappear . . . um, well at least they aren't the huge nightmare they were before.  Let me put it in simpler terms, school has been in session for six weeks now, and my kids have only killed off one of my original twenty-six markers!
Problem #1: The kids push too hard!   

This one is an easy fix!  You will need a pair of needle-nose pliers (I bought a pair at Wal-Mart for $1.39) or tweezers.

Be careful, sometimes the ink splatters when you do this.  I usually do it over the garbage can.  If ink gets on your hands, it washes off.  I'm not sure what happens if it drips on your clothes!

Problem #2: The kids aren't responsible with the markers.

I have done a couple of things to solve this problem.  First, I don't let them keep the markers and whiteboards in their desks.  I used to do this for the sake of convenience, but found that they were too easily accessible for students that chose to misbehave with them.  Now, I keep the markers, boards, and erasers in a communal place.  We get them out only as needed.


Second, each child is assigned a marker, and the marker is labeled the student's name/number (I use numbers in my room).  On the day I assign markers, I heavily emphasize that the markers are MINE, not theirs.  I explain multiple times that I am trusting them with my markers, and that they must be responsible with them.  Responsibilities include keeping the cap on when not writing, and not pushing too hard.  I also tell them that if they kill my marker, I will NOT give them a new one (more about this later).


Third, before every lesson in which we will use the markers, I give them two minutes of drawing time.  This is their opportunity to get the doodles out before they need to focus and learn.  I explain that if they use their markers to draw during learning time, they will lose the privilege of using them. Once learning time starts, we have a "magic word" that signals they can uncap their makers.  I ask for a volunteer to give me a "magic word," then I teach.  When they hear the "magic word," they can uncap the marker and follow directions.

Problem #3: The marker dries out!     

This solution is a bit trickier, and sometimes the solution is only a temporary one.  Using the needle nose pliers, pull the felt marker thingie (does it have a name?) completely out of the plastic sheath.


Flip it over, and insert it back into the plastic sheath.  It is easy to tell which end is which since one will be fuzzy and worn-down, and the other end will be sharp and clearly defined.  I have also heard that if you dip them in rubbing alcohol, they will work again.  I haven't tried this yet, so I don't know if it works or not.

Problem #4: The marker dies!  

Okay, you've tried all your tricks, and the marker is beyond saving.  I tried something this year, and am extremely pleased with the results so far.  My whiteboards are smooth on the back.  Before school started, I sprayed the backs with chalkboard spray (readily available in spray can form at Home Depot, Lowe's, etc).  One can covered 12 boards (each board needs 2-3 coats).  I didn't spray all the boards.


Now, if a student kills a marker, they flip over their whiteboard and I give them a piece of chalk.  At first, I was worried that they would want the chalk and purposely kill their markers.  This has not happened.  I have only had one student progress to this option, and he is not happy about it!  The chalk gets a bit messy (as older teachers can attest to!), but it can easily be cleaned up.

Now, if I can only stop this from happening!!  Maybe I need to assign them whiteboards, too.


I hope these suggestions help make your teaching life a bit easier.  If you know any useful tips, please share them by leaving a comment.

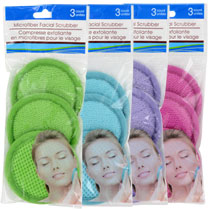
Oh, in case you're interested here is where I bought my whiteboards, and the erasers are make-up applicators bought at the dollar store.  They look like this: