I love technology, and I love incorporating it into my daily instruction, but when I first heard about QR codes I thought it was a bit much. My first year teaching I had a chalkboard in my classroom after all, and now look how far we've come!! Now that I've researched it a bit more, I can honestly say, working with QR codes is easy and fun. So, I will walk you through it, and hopefully you will feel comfortable enough to try it out.
You will need to have three things:
access to YouTube (unfortunately, some districts block it)
a device that the kids can use - IPad, old IPhone, etc.
a QR reader app (they're free - search the app store for one)
The first thing you need to do is cruise YouTube for a good book; not all book videos are created equal! The Storybook Factory, Storyline Online, and The Illustrated Book are a few of my favorite channels. From this point, there are two ways to go. I will cover both ways, and you can decide which you prefer.
#1: The Easy Way
Watch the video all the way through and make sure it will fit your needs. If you like it, copy the URL at the top of the screen.
Go to safeshare.tv and paste the URL into the box. Click the 'Generate Safe Link' button.
A new screen will open. You now have the option to change the title and give the video a description. I always check the two boxes below the description. The first box makes your video private, and the second box removes the social media icons from the video. Click submit.
The new safeshare version of the video will appear. Copy the URL. At this point, you will need to find a QR code generator. My favorite is qrstuff.com. Paste the URL into the box and a QR code will be generated to the right. You can change the color if you want. I keep them black and white since I don't have open access to a color printer.
Click 'download QR code' and it will be downloaded to your computer as a PNG file. You can now manipulate, copy, and paste just like you would any other picture or piece of clipart.
The reason I don't prefer this method is that the safeshare video has options that the kids can select (and you know how kids like to push buttons!). When the safeshare video comes up on your student device it looks like this:
There are three buttons at the top that can be selected: FAQ, Support, and API, as well as the language drop-down option. They won't take the kids to anything they shouldn't see, but I prefer that they have no options outside of the 'play' button. So, when I make my QR codes, I usually use the method outlined below.
#2: A Bit More Complicated (But Not Too Much)
Again, find a video and watch it all the way through. If you like it, click on the share button beneath the video.
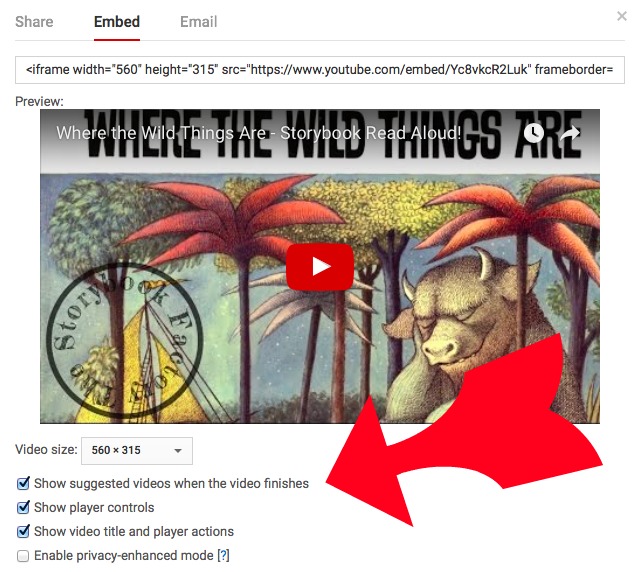
A bunch of icons will drop down, along with three selections: share, embed, and email. Click on embed. A long snippet of code will come up. Click on 'show more' beneath the code.
Deselect any boxes that are checked, and copy the entire snippet of code.
I paste the code into a separate document to make it easier to manipulate. It will look like this (without the highlighting):
Delete everything but the highlighted portion. At the end, after the ampersand (&), add the following snippet of code:
autoplay=1
This will cause the video to open automatically, without all the extra videos that YouTube posts along the side of the screen. The only thing the kids will see is the video and the red play arrow in the center of it (this is why I prefer this method). There will also be no suggested videos at the end of the video. It will simply stop playing. The only option the kids will have is to exit out of it so they can scan another.
The final piece of code should look something like this:
https://www.youtube.com/embed/Yc8vkcR2Lukrel=0&autoplay=1
Go back to the QR code generator.
Copy your code and paste it in the box that says 'website URL.'
Select 'download QR code,' and it will be downloaded to your computer as a PNG file. You can then copy, paste, and manipulate it just like you would any other picture or piece of clipart. It will look like this:
I print them off, and tape them right on the front of the book. Some teachers print them on cardstock, laminate them, and place them all on a ring.


No comments:
Post a Comment